
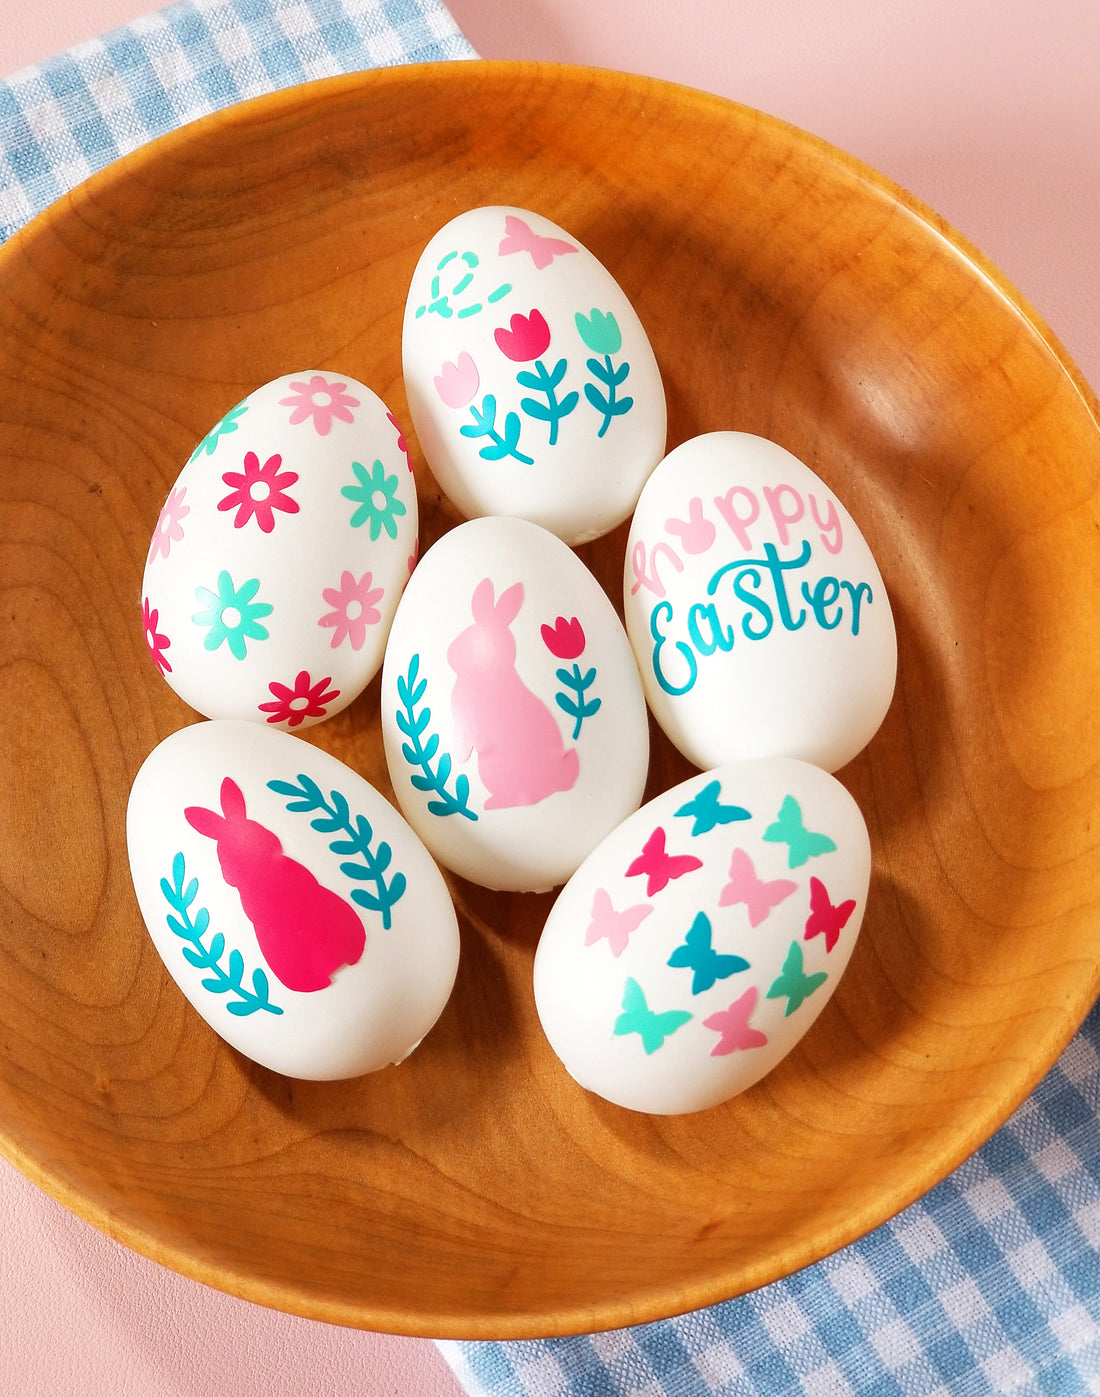

Decorating eggs with vinyl is our new favorite Easter craft! These adorable easter eggs can be a great addtion to your spring decor. They can also be a great way to use up those little vinyl scraps you don't know what to do with. So let's get started!
Click the here to download your FREE SVG Easter Egg Decals

Materials
Scrap pieces of 2"x 2" vinyl will cover one egg :)
-Silhouette vinyl or any craft vinyl
-Transfer tape
-Plastic eggs
-Vinyl weeding tools
-Rubbing alcohol and cloth ( for cleaning the surface of the eggs)
Click below to download the FREE SVG Easter decals for this project.

Step 1: Open the SVG file in SIlhouette Studio or Cricut. Ungroup and arrange the design elements on the grid. You can choose to cut all your vinyl graphics at one time but for this demostration we're focusing on one design. To cut 3 different colours of vinyl for this design, copy and paste the it 3 times. Each copy fits into a 2" square area on the grid.

Step 2: Delete the graphics you don't want cut out of the colour of vinyl you are using for each area. For example, out of the copies we made we deleted the bunny and the flower in the first copy becuase we are going to be putting the green vinyl in that area of the mat.

Step3: Cut and apply your strips of vinyl to your mat so that they correspond with the design elements you want to cut in those colours.(For the expamle design we cut three, 2" x 2" pieces of vinyl). Load your mat and press send in Silhouette Studio. Choose your material type, in this case Vinyl, Matte. Adjust your blade depth manually if you don't have an autoblade. Once your happy with the settings send to cut.

Step4: Remove the mat from the machine and weed off the excess vinyl. Cut a 2"x2" piece of transfer tape and remove backing. Lay the transfer tape onto the first square with the leaves. Press and rub the scraper tool to adhere the vinyl to the transfer tape.

Step5: Next, with the same piece of transfer tape, line up where you want the bunny to go and rub with the scraper to adhere the vinyl to the tape.

Step6: Repeat the process for transfering the last piece of vinyl to the transfer tape.


Step7: Prep your egg by wiping it with some rubbing alchol. Next place the egg on a cloth or surface where it won't roll around. You can put a bit of tape under the egg to help it stay still. Apply the transfer tape to the egg. Firmly rub with the scraper to ahere the design. It helps to work on a tiny area at a time.

Note: For designs such as the flowers where the placement of the vinyl is not important you can use a smaller piece of transfer tape and just apply the flowers one by one :)


Thanks for follwing along with us. We hope you'll have a wonderful Easter, happy crafting!